
Blog
Odoo Docker: from Compose to a working restore
By The Ofleet team9 min read
Contents
An Odoo Docker setup needs the Odoo image, PostgreSQL and persistent storage for both. Before trusting it with your ERP, we recommend one more test: rebuild the application and open a restored attachment. That's where this walkthrough ends, rather than at the first login screen. You'll start with a new Community 20 database on a Linux host running Docker Engine and Compose v2 or later. An existing production database needs a migration plan, not these initialization commands.
The scope is one database named erp, one host, and Nginx running on that host. Sources were checked on November 3, 2026. Enterprise requires its additional modules and a valid subscription; the Community image does not include them.
We ran this setup for the walkthrough, created an attachment, and restored the database and filestore into fresh volumes. The file matched the original. We also checked the websocket connection through Nginx using a test certificate. Those checks don't simulate your workload or validate your custom modules.
1. Choose an Odoo Docker build you can find again#
Pick a dated tag and record the digest you actually pull. The official image registry (nouvel onglet) lists 20.0-20261102 on the date above. Tags such as 20.0 and latest move. Keeping only one of those names leaves you guessing which build you deployed.
In a fresh working directory, create the local credentials:
umask 077
mkdir -p config addons backups
chmod 755 addons
printf 'PG_ADMIN_PASSWORD=%s\nDB_PASSWORD=%s\n' \
  "$(openssl rand -hex 32)" "$(openssl rand -hex 32)" > .env
printf '.env\nconfig/odoo.conf\nbackups/\n' >> .gitignore
Keep .env out of Git and restrict access to the directory. Environment variables aren't a secret vault: Docker administrators can inspect them. Use separate credentials for PostgreSQL administration, the Odoo database role, and the Odoo application administrator.
2. Keep the data outside the containers#
Compose can replace a container while keeping its named volume. That separation is what lets you rebuild without starting over. Save this as compose.yaml for Odoo 20 and PostgreSQL 16:
services:
  db:
    image: postgres:16
    restart: unless-stopped
    environment:
      POSTGRES_USER: postgres
      POSTGRES_PASSWORD: ${PG_ADMIN_PASSWORD:?required}
    volumes:
      - db-data:/var/lib/postgresql/data
    healthcheck:
      test: ["CMD-SHELL", "pg_isready -U postgres -d postgres"]
      interval: 5s
      timeout: 5s
      retries: 12
  web:
    image: odoo:20.0-20261102
    restart: unless-stopped
    depends_on:
      db:
        condition: service_healthy
    environment:
      HOST: db
      PORT: "5432"
      USER: odoo
      PASSWORD: ${DB_PASSWORD:?required}
    ports:
      - "127.0.0.1:8069:8069"
      - "127.0.0.1:8072:8072"
    volumes:
      - web-data:/var/lib/odoo
      - ./config/odoo.conf:/etc/odoo/odoo.conf:ro
      - ./addons:/mnt/extra-addons:ro
volumes:
  db-data:
  web-data:
There is no published PostgreSQL port. Odoo binds to the host's loopback interface only; verify that from another machine as well. The Compose network connects the services. It does not prevent outbound traffic, which matters later when you restore production data for testing.
A PostgreSQL container can work in production if you control its storage and can restore it. An external database is also reasonable when you need independent maintenance. Either way, containerization doesn't replace a backup plan.
Start PostgreSQL on its own, then open psql:
docker compose up -d --wait db
docker compose exec db psql -U postgres -d postgres
Run the following SQL and psql commands. At the \password prompts, enter the DB_PASSWORD value from .env twice:
CREATE ROLE odoo LOGIN NOSUPERUSER NOCREATEDB NOCREATEROLE;
\password odoo
CREATE DATABASE erp OWNER odoo;
\q
Odoo now has a dedicated role rather than the superuser created by the PostgreSQL image. The role owns this database, a deliberate simplification for this setup. If your security model separates ownership from runtime privileges, apply that stricter model instead.
3. Initialize privately before accepting public traffic#
Select one database explicitly and disable database listing. Create config/odoo.conf, replace the master-password placeholder with a separate random secret, and make the mounted file readable by the container's odoo user:
[options]
admin_passwd = REPLACE_WITH_A_RANDOM_SECRET
db_name = erp
dbfilter = ^erp$
list_db = False
data_dir = /var/lib/odoo
addons_path = /mnt/extra-addons
http_interface = 0.0.0.0
workers = 2
max_cron_threads = 1
proxy_mode = True
gevent_port = 8072
With a private host directory (chmod 700 config), chmod 644 config/odoo.conf lets the container read the mounted file without giving other host users access through that directory.
Two workers are an example setting, not a capacity claim. Use the Odoo server sizing calculations to budget memory, cron work and peaks. proxy_mode assumes normal application access goes exclusively through your reverse proxy.
The official image's entrypoint (nouvel onglet) reads HOST, PORT, USER and PASSWORD. Don't add a conflicting db_password to the configuration: that setting takes precedence over the environment value you expected to use. With this data_dir, the database's attachment files live under /var/lib/odoo/filestore/erp.
docker compose pull
docker image inspect --format '{{index .RepoDigests 0}}' odoo:20.0-20261102 postgres:16
docker compose config --quiet
docker compose run --rm web odoo -d erp -i base \
  --without-demo=all --stop-after-init --workers=0 --max-cron-threads=0
docker compose up -d web
docker compose logs --tail=100 web
Before opening public access, use an SSH tunnel to 127.0.0.1:8069. Sign in with the initial admin account and admin password, then change the credentials immediately. Upload an identifiable test attachment. You'll use that file to check the restore, so choose something you can recognize without consulting a database table.
4. Route websocket traffic to the right worker#
In multi-process mode, /websocket goes to port 8072. Ordinary HTTP requests go to 8069. The Odoo 20 deployment documentation (nouvel onglet) explains this routing and HTTPS termination.
For Nginx installed on the host, put the following fragment inside its http context, usually through sites-enabled. Replace the domain and certificate paths with your already installed certificate. Run nginx -t before reloading:
map $http_upgrade $connection_upgrade {
    default upgrade;
    '' close;
}
server {
    listen 80;
    server_name erp.example.com;
    return 301 https://$host$request_uri;
}
server {
    listen 443 ssl;
    server_name erp.example.com;
    ssl_certificate /etc/letsencrypt/live/erp.example.com/fullchain.pem;
    ssl_certificate_key /etc/letsencrypt/live/erp.example.com/privkey.pem;
    ssl_protocols TLSv1.2 TLSv1.3;
    client_max_body_size 50m;
    proxy_read_timeout 720s;
    proxy_set_header Host $host;
    proxy_set_header X-Forwarded-Host $host;
    proxy_set_header X-Forwarded-For $remote_addr;
    proxy_set_header X-Forwarded-Proto $scheme;
    proxy_set_header X-Real-IP $remote_addr;
    location ^~ /web/database {
        return 403;
    }
    location /websocket {
        proxy_pass http://127.0.0.1:8072;
        proxy_http_version 1.1;
        proxy_set_header Upgrade $http_upgrade;
        proxy_set_header Connection $connection_upgrade;
        proxy_set_header Host $host;
        proxy_set_header X-Forwarded-Host $host;
        proxy_set_header X-Forwarded-For $remote_addr;
        proxy_set_header X-Forwarded-Proto $scheme;
        proxy_set_header X-Real-IP $remote_addr;
    }
    location / {
        proxy_pass http://127.0.0.1:8069;
    }
}
The websocket location repeats the forwarded headers for a reason: Nginx doesn't inherit the parent's proxy_set_header directives when a child block defines its own. The upload limit and read timeout are example values; adjust them to your actual workloads.
In your browser's Network panel, check that the websocket connection receives status 101. Also check that /web/database/manager returns 403. Loading a login page proves neither. Arrange certificate renewal and an alert if renewal fails before calling this a production deployment.
5. Ship add-ons with the application, not a running container#
Put Odoo 20-compatible modules under addons, each with its __manifest__.py. An OCA repository can contain multiple modules: their directories must be discoverable through addons_path. Restart after deploying code, then install the required module on a test copy before applying it to production.
If a module needs extra Python packages or Linux libraries, build a versioned derived image. Installing packages interactively inside a running container leaves you with changes that disappear when it is replaced. Record each add-on repository's commit alongside the image digest. An old image with new module code is not the application you meant to roll back to.
6. Back up the database and filestore as one set#
Stop every process that can write to this database before copying either part. In this setup, the single web service includes the cron workers. Run the following in a dedicated Bash shell from the Compose directory:
set -eu
umask 077
backup="backups/$(date -u +%Y%m%dT%H%M%SZ)"
mkdir -p "$backup"
docker compose stop -t 120 web
trap 'docker compose start web' EXIT
docker compose exec -T db pg_dump -U odoo -Fc erp > "$backup/db.dump.part"
docker compose run --rm --no-deps --entrypoint tar web \
  -C /var/lib/odoo -czf - filestore/erp > "$backup/filestore.tar.gz.part"
mv "$backup/db.dump.part" "$backup/db.dump"
mv "$backup/filestore.tar.gz.part" "$backup/filestore.tar.gz"
sha256sum "$backup/db.dump" "$backup/filestore.tar.gz" > "$backup/SHA256SUMS"
The shell's exit trap restarts web, including when a copy fails. Treat any set containing .part files as incomplete. Keep the configuration, image references and add-on code too. Encrypt the backup and copy it off the server: another Docker volume on the same disk won't survive losing the host.
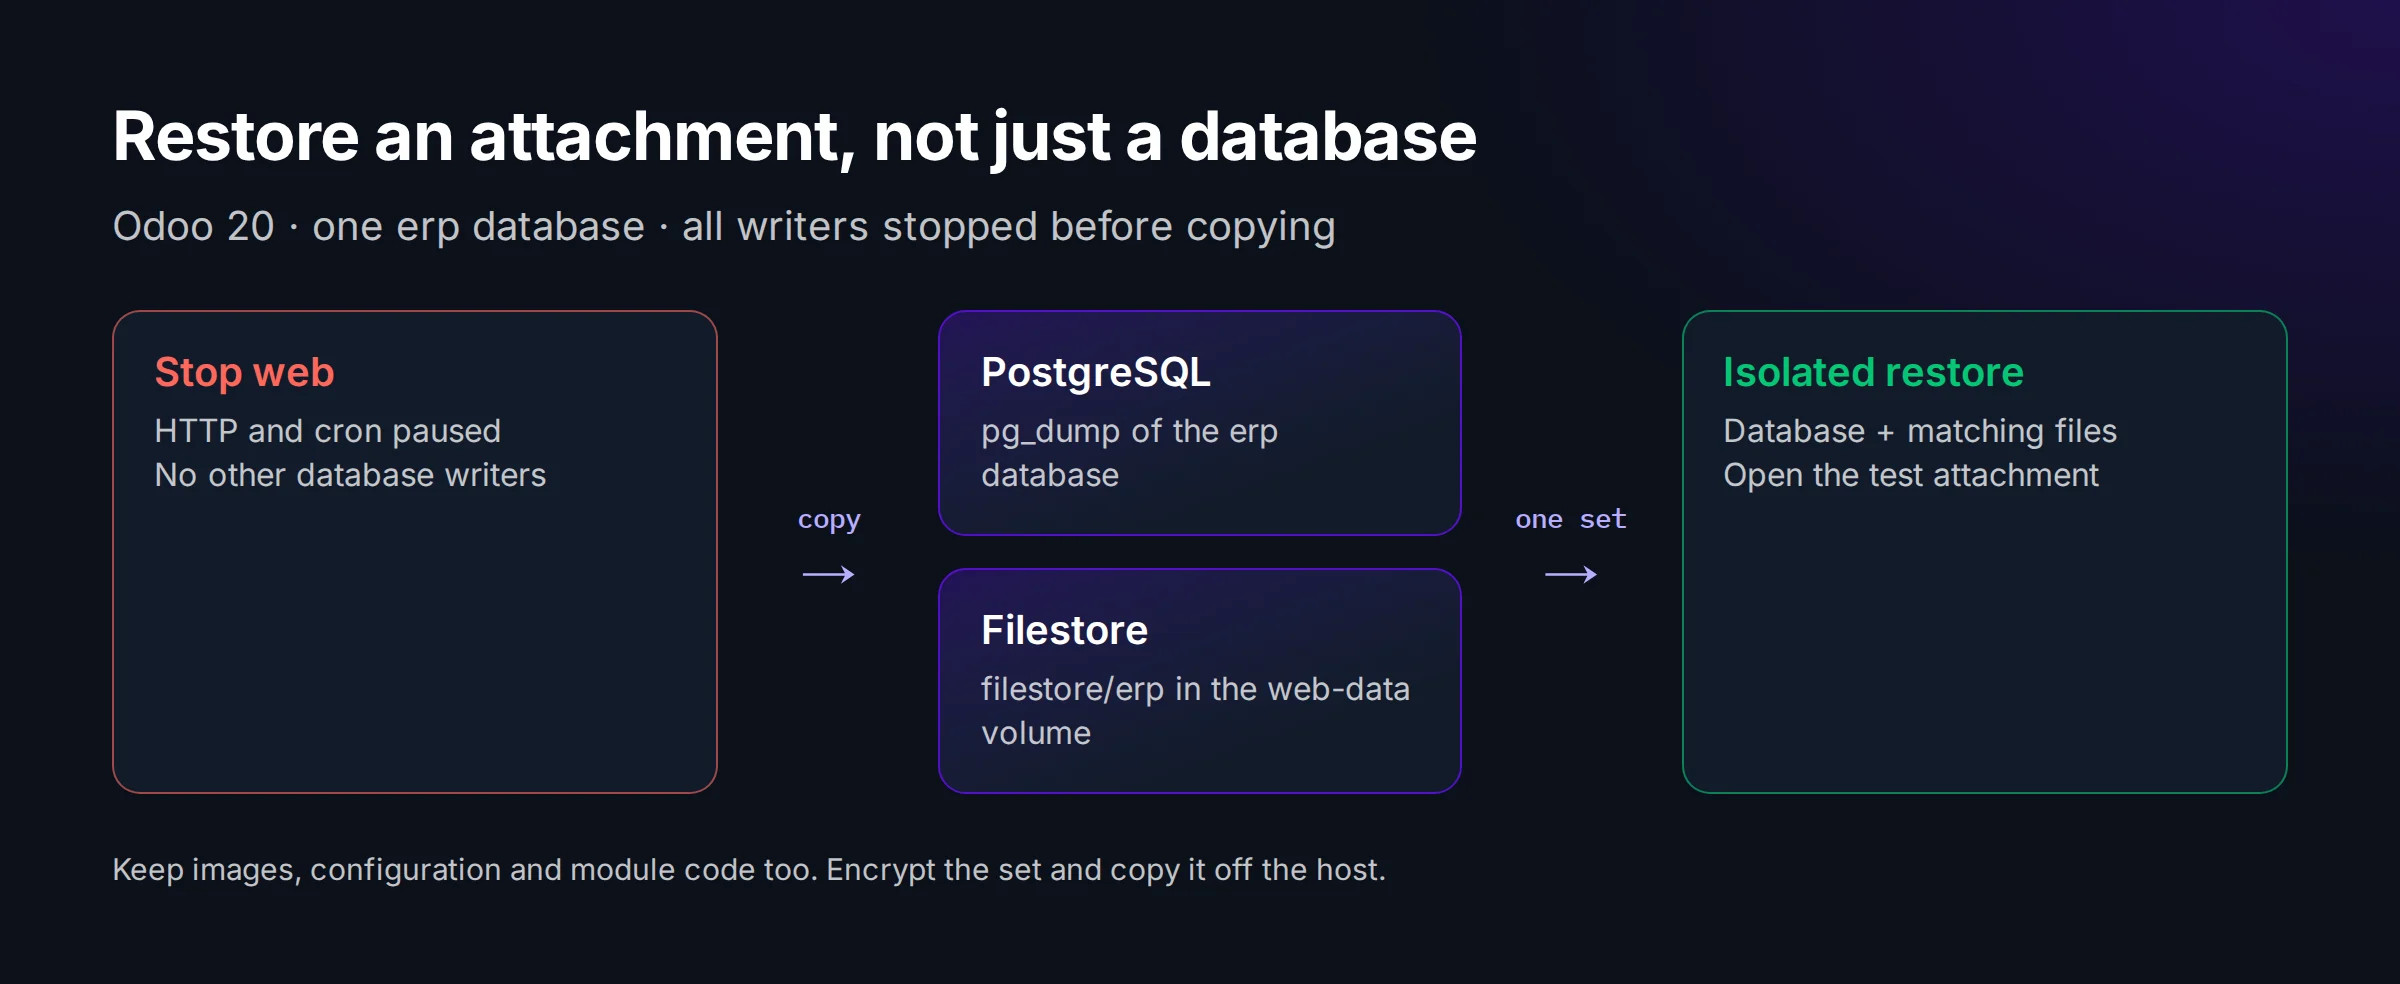
Use a separate, isolated host for the restore, with no access to external services:
- Bring the same files and images. Repeat step 2 to create an empty
erpdatabase and itsodoorole. - Copy the backup set and verify its checksums. Don't start
webyet. - Import both parts using the commands below. They target only this new, empty database.
- Disable your modules' outbound integrations before starting. Keep the test network isolated and cron workers off until those checks are done.
docker compose exec -T db pg_restore -U odoo -d erp \
  --no-owner --exit-on-error < backups/SET/db.dump
docker compose run --rm --no-deps --entrypoint tar web \
  -C /var/lib/odoo -xzf - < backups/SET/filestore.tar.gz
On the copy, set workers = 0 and max_cron_threads = 0, then start behind your private test access. Find the attachment you uploaded earlier and open it. A successful SQL import with a missing document is still a failed restore.
7. Treat patching and major upgrades as different jobs#
A newer Odoo 20 build is not the same operation as moving an Odoo 19 database to 20.
| Change | Before changing production |
|---|---|
| New Odoo 20 build | Restore a copy, test modules and reports, back up, change the tag, then recreate web |
| Odoo 19 to 20 | Migrate the database and port the modules; an image change does neither |
| New PostgreSQL major version | Plan a PostgreSQL migration rather than pointing it blindly at the old volume |
For a tested patch, docker compose pull web followed by docker compose up -d --no-deps web keeps the volumes. Do not run docker compose down -v against data you need. If an update changed the schema, changing back to the old image is not a rollback plan. Restore the matching backup set you prepared instead.
Running this yourself also means watching disk space, errors and backup restores. If you'd rather spend that time on modules, compare the Odoo hosting options. You can also try Ofleet to test your code on a separate instance without building this stack yourself.
Read next
 odoohosting
Odoo server maintenance: tasks your team can own
Own your Odoo server maintenance: assign monitoring and backup tasks, test an isolated restore, and record evidence before the next production incident.November 5, 202610 min readBy The Ofleet teamRead article odoohosting
Odoo AWS: deploy on EC2 and budget for recovery
Odoo AWS deployment on EC2: choose PostgreSQL or RDS, protect internal ports, pair database and filestore backups, and calculate a dated monthly budget.November 5, 20268 min readBy The Ofleet teamRead article odoohosting
Odoo security: a verifiable self-hosting checklist
Odoo security for self-hosted instances: verify database manager isolation, proxy settings, two-factor authentication and recoverable backups.November 2, 20266 min readBy The Ofleet teamRead article